Last Updated on: 25th August 2025, 03:14 pm
Most injuries will occur within the first 15 minutes of a game, due to an insufficient warm-up, or the last 15 minutes, due to fatigue. Prevent this by ensuring your players are fully warmed up and fit before your match. Your pre-match warm-up should include movement, dynamic stretches, and ball drills. Read on to see our basic strategy and tips for coaches.
The Importance of a Good Warm-Up
Every player should understand the importance of a good warm-up. It helps prevent injury and aids them on the pitch. So, all players should arrive with time for an adequate warm-up. Let them know when to arrive and, if necessary, include a rule that a player doesn’t start the match if they’re late.
Ideally, you’ll want to spend about 30 minutes warming up before the match. This will give you enough time to prepare and ensure your players are still warm when the game starts.
Why Your Warm-up Matters
Injury prevention
One of the most important reasons for a good warm-up is to prevent injury. Without one, your players risk straining muscles, tendons, and ligaments. You want to stretch and gently exercise the muscles you’re about to use. Your routine should also raise your body temperature, speed up your heart rate, and increase blood flow to your muscles.
Getting in the right mindset
A warm-up isn’t just a time to physically prepare for your match. It will also help your players get into the right mindset. Some players will feel pressure or anxiety before a game. A familiar warm-up routine can be a useful coping mechanism. It gives the player something to focus on and prevents them from getting distracted.
Optimum performance
You want your players to be ready for anything. Some teams will start strong, so your players must be prepared to match them. Including ball drills will give them a feel for the ball and the pitch. This means they’ll be playing at their best from the start.
Stick to a Routine
Ideally, your warm-up routine should be pretty familiar to your team, so don’t introduce new drills on match day. The aim isn’t to develop new skills or try new approaches. Instead, you want your players warm for the match. So, be aware of your kick-off time when you let players know when to arrive.
You can switch things up slightly if you have specific issues to work on. Maybe do individual training with certain players or include some alternative drills from your training sessions. However, the warm-up routine should be something they can just focus on without much explanation.
Weather Dependent Warm-Up
The main reason that you might want to change your routine is due to weather conditions. During colder months, you should spend more time on the first stage to properly warm up your body. It will take longer to get their temperature up when it’s colder.
Stage 1 – Get Moving
Your muscles respond best when warm, so don’t start your warm-up with stretching. Set them off with some low-impact body exercises to increase their heart rate. Keep it simple with something like running in place or skipping.
Then get them to run across the field six times. The first two times should be gentle and relaxed. On the third and fourth times, they can include some backwards or sideways movement. The final two times should be at a faster pace and include the following four phases:
- Jogging
- Striding
- Accelerating
- Slowing Down
By this point, they’ll have warmed up and their muscles will be ready for the next stage.
 Stage 2 – Dynamic Stretches
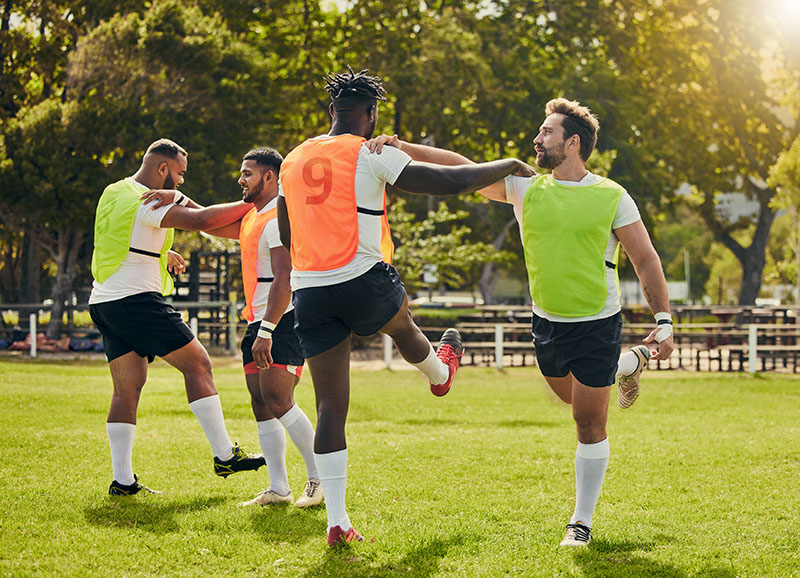
Dynamic stretches are generally more effective than static stretches as they don’t give your body time to cool down. They will involve movement and mimic actions you’ll perform on the pitch, so your players are ready for the match. There are plenty of great dynamic stretches to include in your warm-up. See a few examples below.
High Knees
Jog on the spot while bringing knees up to the chest. Perform for 30 seconds. It’s a great way to get the heart pumping and target your hips and core muscles.
Leg Swings
Swing each leg back and forth while balancing on the other leg. Perform 15 swings per leg to warm up the muscles in your hips, thighs, and lower legs.
Lunge Walk
Step forward into a lunge then bring your back foot up and step into another lunge. Continue moving forward for 15 reps per side. This is great for stretching legs and improving balance.
Carioca
Start with your feet shoulder-width apart. Cross your left foot behind your right foot, then take your right foot over so you’re in the starting position. Cross your left foot in front of your right and continue moving forward. Move for about 10m.
Inchworm
Stand with your feet close together and your legs straight. Reach down and put your hands on the floor. Walk your hands forward until you’re in a plank, then walk your feet forward until they reach your hands. Repeat for 15 reps.
Stage 3 – Football Drills
Your warm-up shouldn’t just be about getting stretching and cardio. It’s a great opportunity to prepare the players for the pitch. Ball drills will get them to focus on specific skills and give them a feel for the ball. Try to pick drills that replicate match conditions, so they’re ready for anything.
Below are a few useful examples that you might want to include.
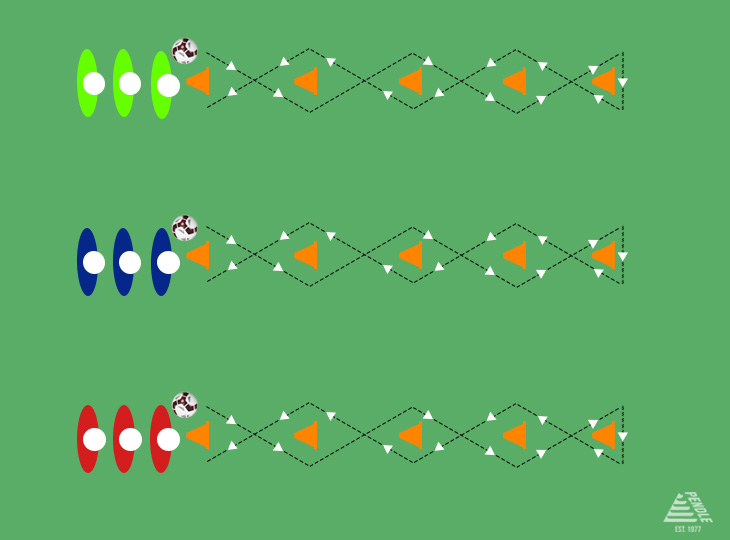
Slalom Dribbling Relay
Equipment Needed: Cones, footballs
Set-Up: Set up a course of cones for players to run between. Divide the players into two teams.
Instructions:
- Players stand in a line at the first cone.
- On the coach’s signal, the first player dribbles the ball back and forth between the cones.
- When they get back to the start, they pass the ball to the next player and sit down.
- The next player starts their leg and does the same.
- The first team to have all players sitting down wins.
Reasons for Doing This Drill:
Relay races are a great way to promote competition and increase their heart rate. Adding a slalom course will give them a feel for the ball before the match.
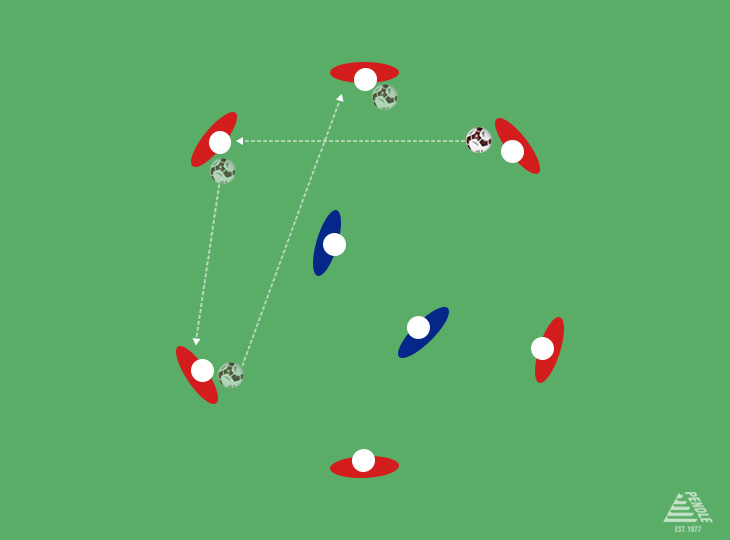
Passing and Movement Drill (Rondo)
Equipment Needed: 5-6 cones, 1 football
Set-Up: Set up a boundary with the cones, and divide the players into teams (5-6 players vs 1-2 players).
Instructions:
- The larger team forms a circle and the other team stands in the middle.
- The players in the middle act as defenders and they try to intercept the ball.
- Players on the outside must keep control by passing the ball quickly among themselves.
- If a defender intercepts, they switch places with the player who lost the ball.
- Perform for 5 minutes, then rotate defenders.
Reasons for Doing This Drill:
This drill helps with passing accuracy, decision-making, and communication. It’s a great way to promote teamwork and encourage players to maintain possession under pressure.
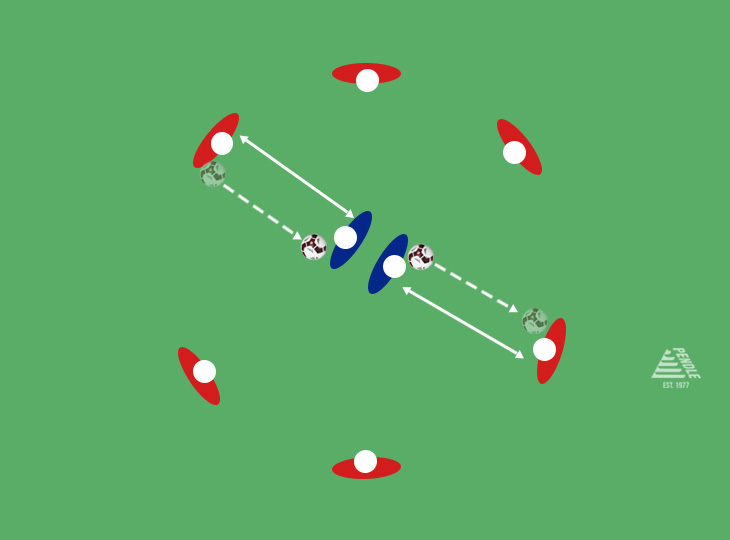
Circle Passing
Equipment Needed: 2 footballs
Set-Up: Create a circle with 2 players in the centre. Each player in the middle has a ball.
Instructions:
- Each central player passes the ball to a player on the outside.
- The outside players dribble the ball into the middle and swap places with the central players.
- The new central players continue the drill by passing to the player next to their original position.
- The central players must be aware of who the other one is passing to before picking their target.
Reasons for Doing This Drill:
This drill focuses on passing, communication, and playing at speed. It’s a great warm-up and gets players thinking about what’s going on around them.
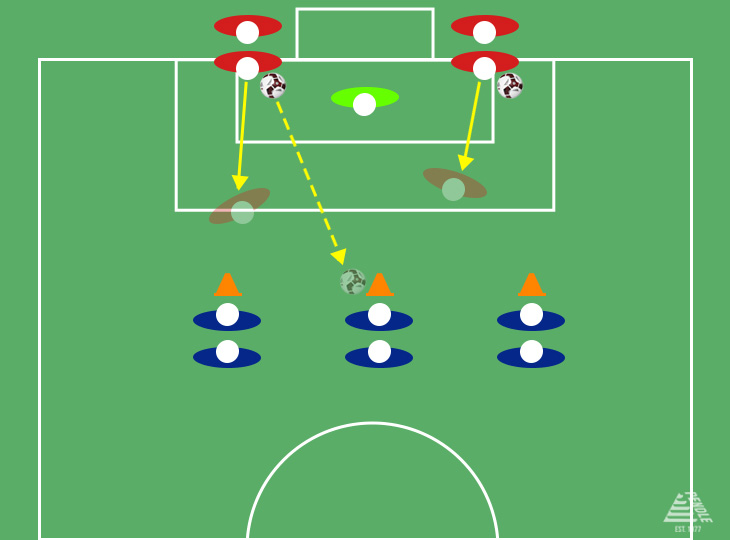
3v2 Shooting Drill
Equipment Needed: Cones, football, goal.
Set-Up: Set up 3 cones around 20-30m from a goal. Divide attacking players into 3 and have them stand behind the cones. The defending players form two lines at the goalposts.
Instructions:
- One of the defenders plays the ball to the attackers.
- The attackers then play 3v2 to goal.
- Attackers are trying to score quickly.
- The defenders move up towards the attackers and try to win the ball.
Reasons for Doing This Drill:
The drill replicates in-game scenarios and prepares players for the pitch. They get experience of playing under pressure and maintaining possession.
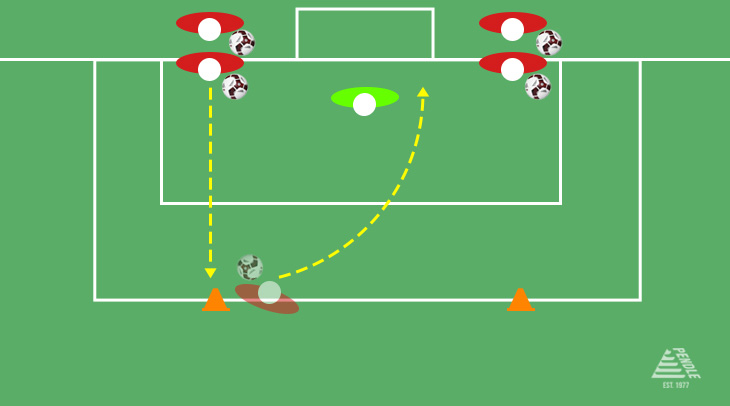
Rapid Fire
Equipment Needed: A goal, two cones, footballs.
Set-Up: Divide players into two groups and have them form lines by the goalposts. Place a cone opposite each line at the top of the penalty area.
Instructions:
- One player dribbles to the cone in front of them.
- When they reach the cone, they turn and take a shot.
- Once the first player has reached their cone, the player at the front of the second line begins.
- Once a player has taken their shot, they must retrieve their ball and stand at the back of the opposite line.
- If you have a lot of players, use several goals to avoid too much standing around.
Reasons for Doing This Drill:
This is great for getting players moving quickly and practicing finishing. They must also be aware of the players around them. Get everyone to practice shooting with both feet.
Tips for Coaches
- Tailor to your team’s needs: Make sure you adapt your drills based on your players’ age and ability.
- Encourage communication: Build teamwork by encouraging your team to communicate with each other.
- Monitor intensity: You want your warm-up to be intense enough to prepare them for the match but not so intense that they become fatigued.
- Consistency is key: Regular practice of these drills helps players develop and maintain their skills over time.
Following the same techniques that you use during training sessions will help enhance your players’ kills and get them ready for the match. Make sure you leave enough time and that your team feels mentally prepared.
Get Everything You Need
Make sure you’re ready for your warm-up by checking out our range of training equipment. You’ll need plenty of balls and cones to set up drills. We also have poles, markers, pop-up goals, and more so you can set them through their paces. Browse the full range now.
Tags: football drills, football match preparation, football matches, Football training, warm-up

