Last Updated on: 6th June 2025, 11:20 am
How to Mark Out a Football Pitch
Football Pitch Size Guide
In our guide to pitch maintenance, we gave an overview of the tasks involved in keeping your pitch in a playable condition. One of those tasks was marking out the actual pitch. Obviously, it’s an important task and needs to be done accurately. Measuring and marking the pitch is a big job but, if you approach it carefully, it’s something you can organise. How you approach the task will depend on your budget, time and the teams that will be using the pitch.
Equipment needed:
- Appropriate paint
- A paint machine
- A tape measure
- Wooden stakes
- Long pieces of string or wire
Before you start
In order to get the best result, you should always mark your pitch in the optimal conditions. Before you start measuring out the pitch, there are a few things to think about.
- Cut the grass and remove all cuttings from the pitch.
- Make sure the pitch is clear of any obstructions.
- Try to pick a day when the grass is dry. This will help ensure that the paint sticks.
- Prepare your paint properly. Depending on what you get, you might need to mix it with water to get the correct consistency.
FA Recommended Pitch Sizes
Before you start measuring the dimensions of your football pitch, you need to know how big it needs to be. This depends on the age of the players that will be using it. The FA set out recommendations for each age group. See the table below or check out the FA’s website.
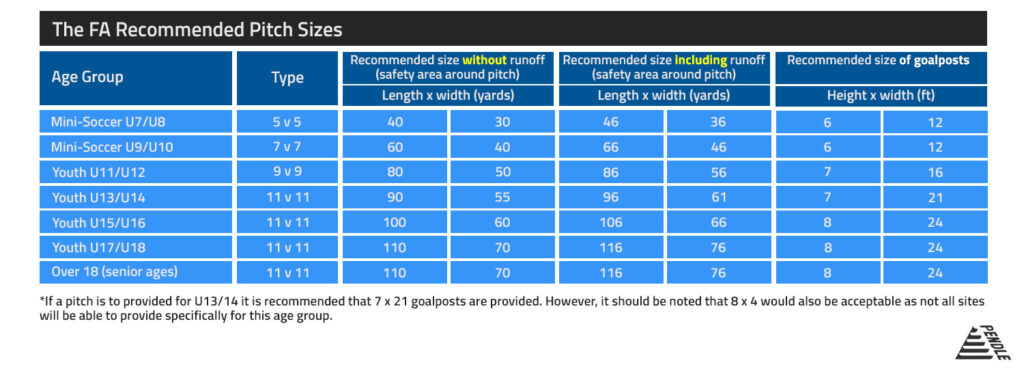
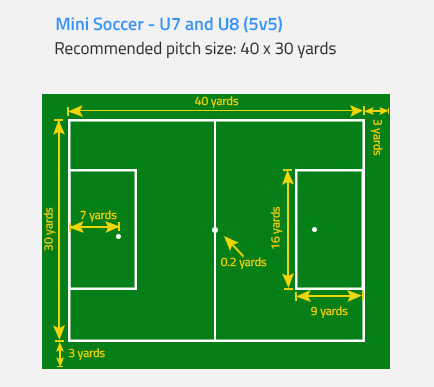
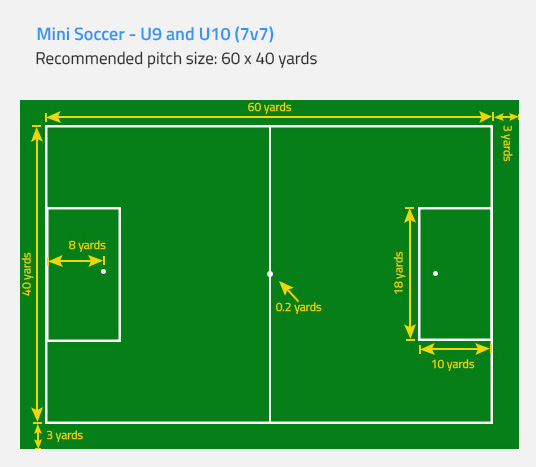
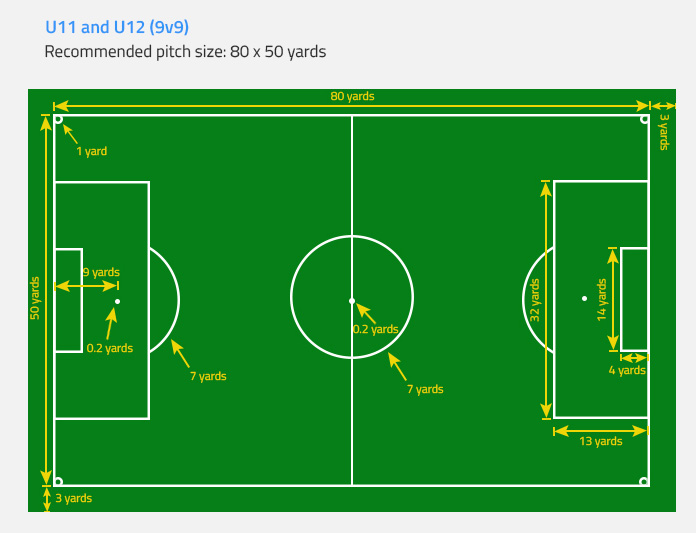
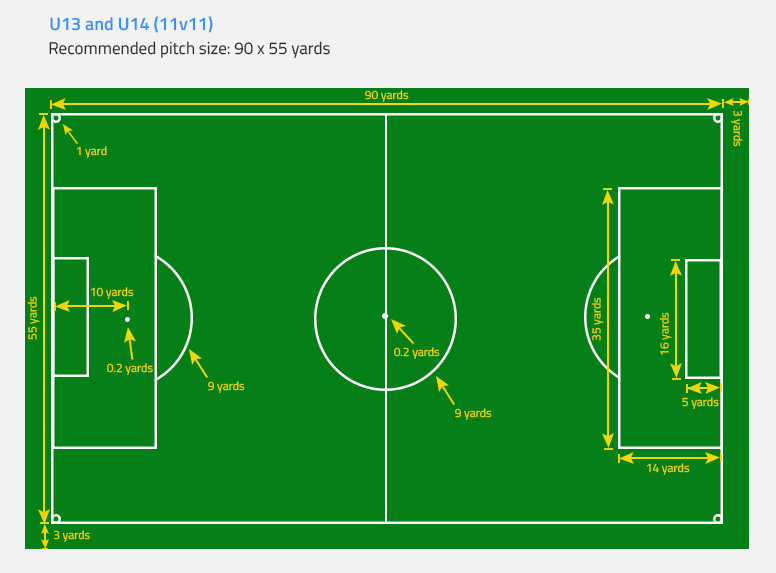
Of course, when measuring out your pitch, you need to know more than just the length and width. To see all of the dimensions for each pitch size, check out our handy graphics below.
Mini Soccer U7/U8
Mini Soccer U9/U10
U11/U12 Pitch Dimensions
U13/U14 Pitch Dimensions
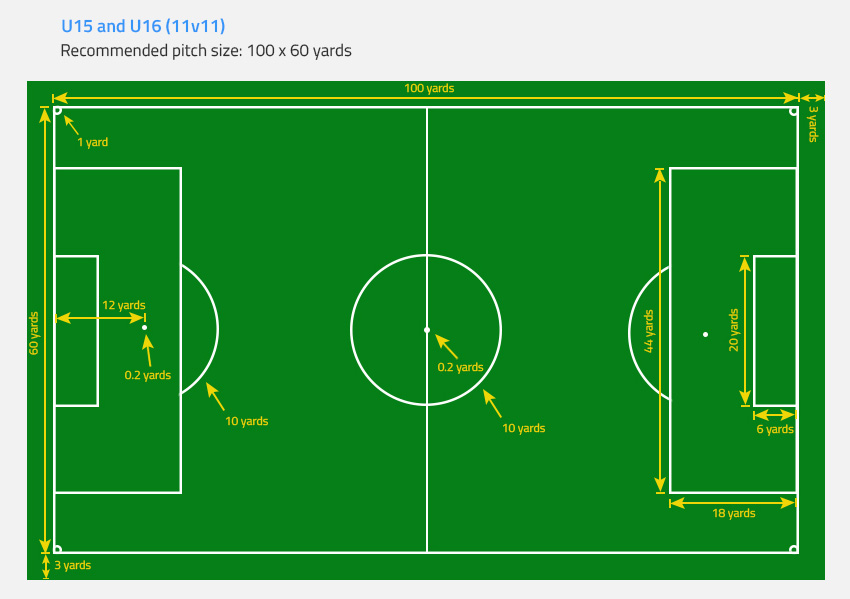
U15/16 Pitch Dimensions
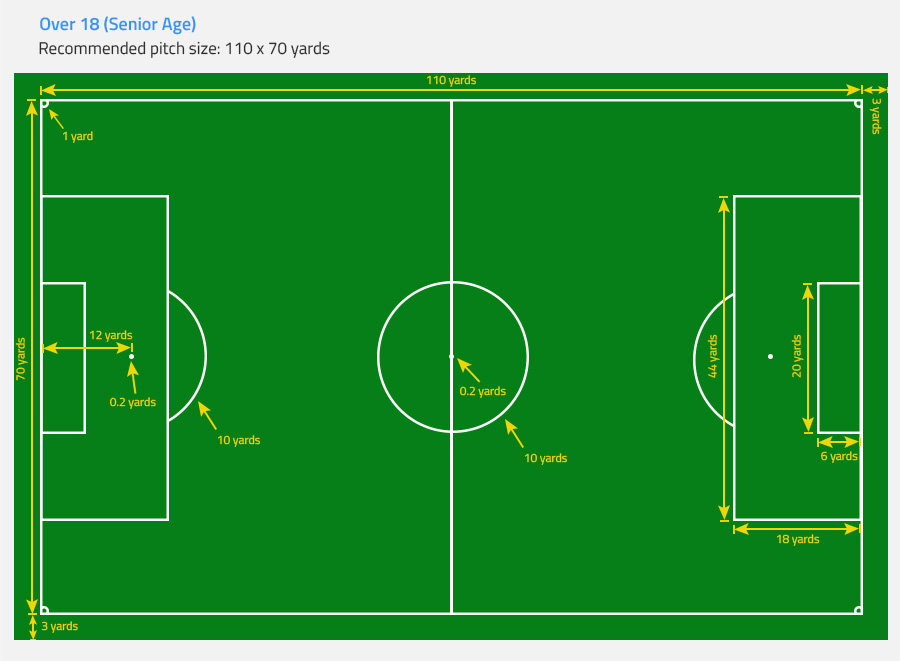
Over 18 (Senior Ages)
Measuring the pitch
Now that you know all the correct dimensions, you just need to ensure that you mark out accurately. Get someone to help you so you can be certain all measurements are correct. The first step will be measuring out the perimeter, which means right angles. The 3-4-5 method is the best way to ensure that you get the perfect angle at every corner.

The 3-4-5 Method
- Lay down the correct length of string for your baseline. Make sure the string is taught and in a straight line.
- Place a peg (Peg A) in a spot where you’ll have a corner flag.
- Starting at Peg A, measure out 30m along the goal line. Place a second peg (Peg B) and tie a string between A and B.
- Starting at Peg A, measure out 40m along the length of the pitch. Place a third peg (Peg C) and tie a string between A and C.
- Measure the diagonal distance between Peg B and Peg C. To get the perfect right angle, this distance should be 50m. Adjust the lines until you get the correct length.
- Extend the line between A and C along the full length of the pitch. This will depend on the age of the players.
- Repeat the steps above until you get 4 perfect right angles and a perfectly straight perimeter.
Penalty Box/ 18-Yard Box
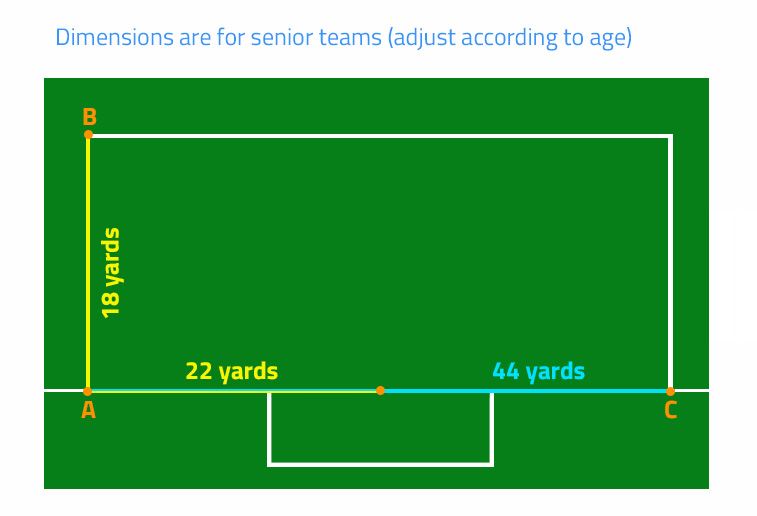
Now that you have a perimeter with perfect angles, you can start marking out the rest. Starting with the penalty box. Remember to measure and peg out the box perimeters from the centre of the goal. For our method below, we’ve used the measurements for an Over 18s pitch so you’ll need to adjust depending on the age of your players.
- Starting at the centre of the goal, measure 22 yards along the width of the pitch. Place a peg (Peg A).
- From Peg A, measure 18 yards onto the pitch and place a second peg (Peg B).
- Measure 44 yards along the width of the pitch from Peg A and place third peg (Peg C).
- From Peg C, measure 18 yards onto the pitch and place a final peg (Peg D).
- Finish the box by joining up Peg B and Peg D.
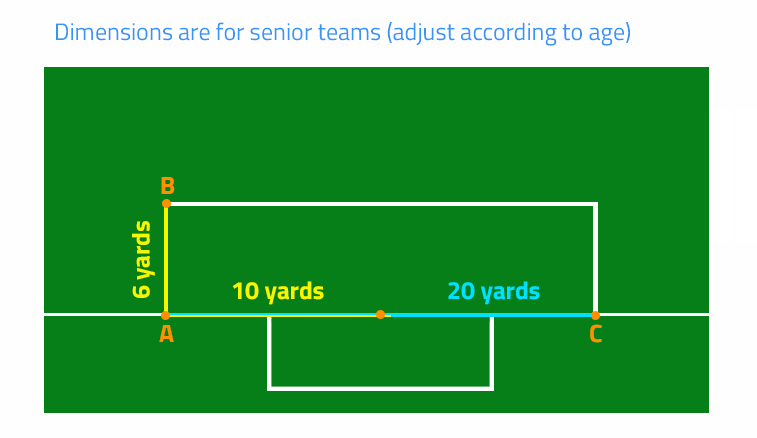
Goal Area/6-Yard Box
Once the penalty box has been marked out, you can move onto the 6-yard box.
- Starting at the centre of the goal, measure 10 yards along the width of the pitch. Place a peg (peg A).
- From that peg, measure 6 yards onto the pitch and place a second peg (peg B).
- Measure 20 yards along the width of the pitch from Peg A. Place a peg (Peg C)
- From Peg C, measure 6 yards onto the pitch and place a final peg (Peg D).
- Finish the box by joining up Peg B and Peg D.
Centre Line
- Place a peg at the halfway point on both lengths of the pitch. Run a string between the two pegs.
- Find the midway point of this line and mark it with a spray can, chalk or a brush. Place a peg in the centre spot and attach a string to it.
- Attach a piece of chalk, a brush or a spray can to the other end of the string. Keep the string tight and walk around the peg in a perfect circle. Marking out the line as you go.
Final Touches
Now the majority of the lines have been marked out, it’s time to get the final details down. Then you can start to mark over the pitch with your paint.
- Mark out the penalty spot on each end of the pitch. From the centre of the goal lines, measure out the correct distance and mark the spot using a brush or spray can.
- Place a peg in the penalty spot and attach a piece of string. Using the same technique as you used for the centre circle, mark out the penalty arc to the correct radius.
- Place a peg in each corner and mark the corner arcs using the same method as above.
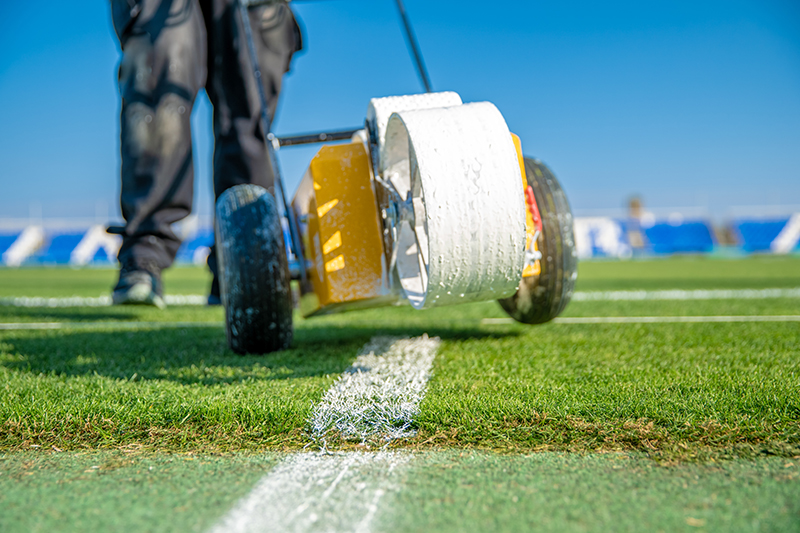
Now that every line has been marked out with either string or paint, you will be able to go over the lines with your paint machine.
Marking the Pitch
The main thing to remember when marking the pitch is that lines need to be clear and accurate. This is to ensure that the rules can be followed and that all matches can be fairly refereed. Make sure that you use a purpose-made line-marking compound that fits with all health and safety guidance. A risk assessment should be carried out beforehand and PPE should be worn.
Line Marking Machines
There are several different types of line marking machines available. They include:
1. Dry Line Markers – As the name implies, these are for applying dry powder compounds.
2. Pressure Pump Markers- A wheel-driven pump forces marking fluid through a jet or spout directly onto the turf surface.
3. Electric Pump Markers – These are battery-driven to constantly maintain the required pressure and direct the liquid onto the turf surface.
4. Belt Feed Markers – These have a moving belt system which conveys a continual supply of liquid onto the turf surface by contact
5. Wheel Transfer Markers – These convey the liquid via a rotating wheel onto a tray and then via a sponge wheel directly onto the turf surface.
It is important that you select the most appropriate machine based on your requirements and budget. Find out more about the most common line markers here.
Top Tips
- Make sure your paint is properly mixed to prevent lumps and blockages.
- Do not fill or refill the marker on the pitch.
- Walk at a consistent speed that is appropriate for the conditions.
- Turn the line marker off before leaving the line.
Ask the Experts
Getting your pitch markings correct is important for many reasons. It’s not the kind of thing that you want to get wrong. It’s always best to talk to experts when buying your paint and line-marking machine. Make sure you get the correct equipment for your requirements. View this helpful video on the GMA website for tips on how to approach the task.
Tags: football pitch, football pitch maintenance, football pitch markings, pitch maintenance
